- Empty cart.
- Continue Shopping
Converting Hardwired Lights to Remote Control: The 2026 Australian Guide
- Posted on
 Strong Digital
- 0
- Categories: Uncategorized
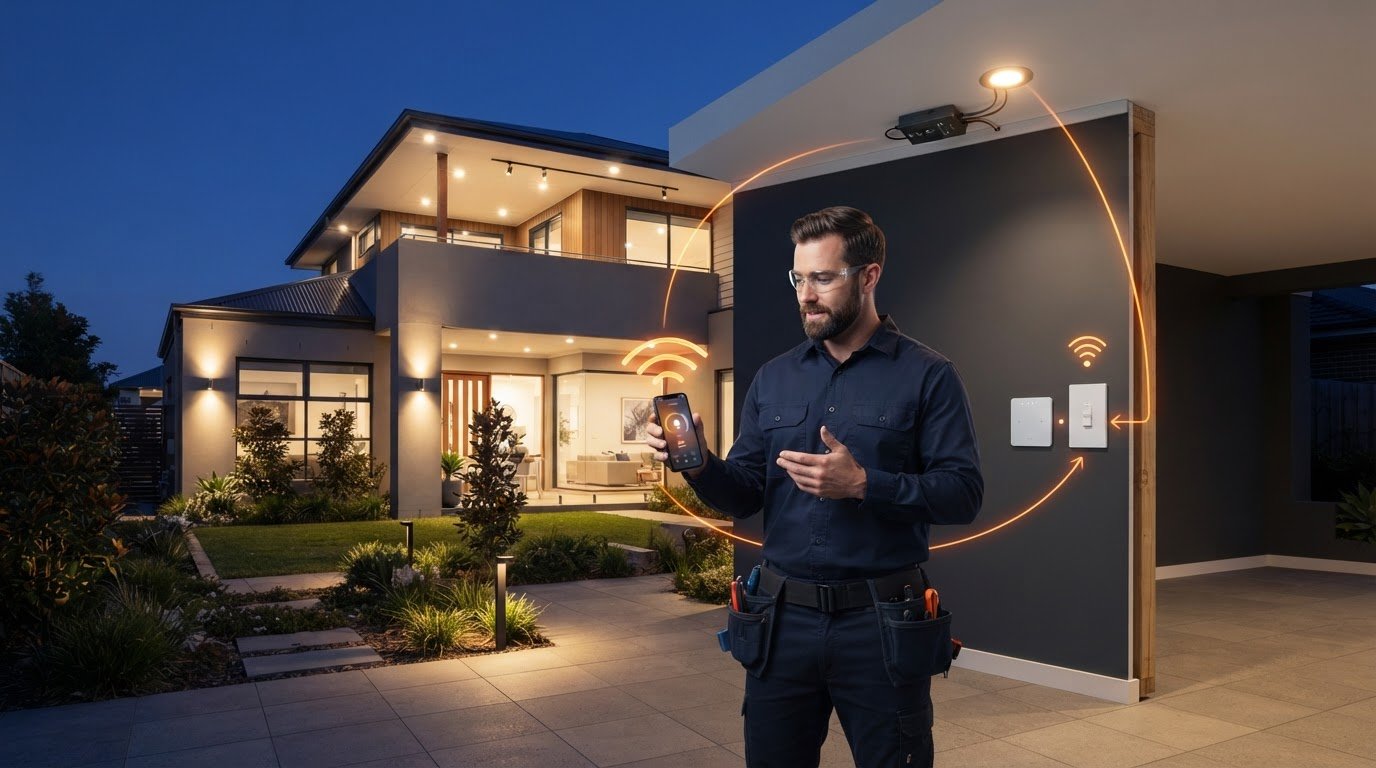
What if you could position a light switch anywhere in your home without cutting open a single wall? If you are living with awkwardly placed switches across your living spaces or outdoor areas, the frustration is familiar. Most homeowners assume that converting hardwired lights to remote control requires invasive wall channelling, messy plaster repairs, and running fresh cables through finished cavities. Fortunately, that disruption is entirely unnecessary.
You can upgrade your lighting without turning your living room into a dusty construction site. In this 2026 guide, you will learn how to convert hardwired light fittings into convenient, remote-controlled systems without cutting plaster or pulling new wiring through your walls. We examine durable, compliant switching hardware, address Australian wiring safety rules, and show you how to gain seamless control over your ceiling lights with zero cosmetic damage.
Key Takeaways
- Discover how converting hardwired lights to remote control using discreet receiver hardware eliminates messy wall channelling and plaster patching.
- Understand why dedicated switching modules outperform smart globes by maintaining constant power without dropping offline when a physical switch is flipped.
- Learn the critical AS/NZS 3000 compliance standards and why mains-voltage modifications strictly require a licensed electrical contractor.
- Identify practical solutions for older Australian homes that lack a neutral conductor at the wall switch plate.
- Select the right hardware for your layout, from versatile Switch Module Kits to Long Range Switches built for challenging building substrates.
Understanding Hardwired Lighting: Why Retrofitting Remote Control Makes Sense
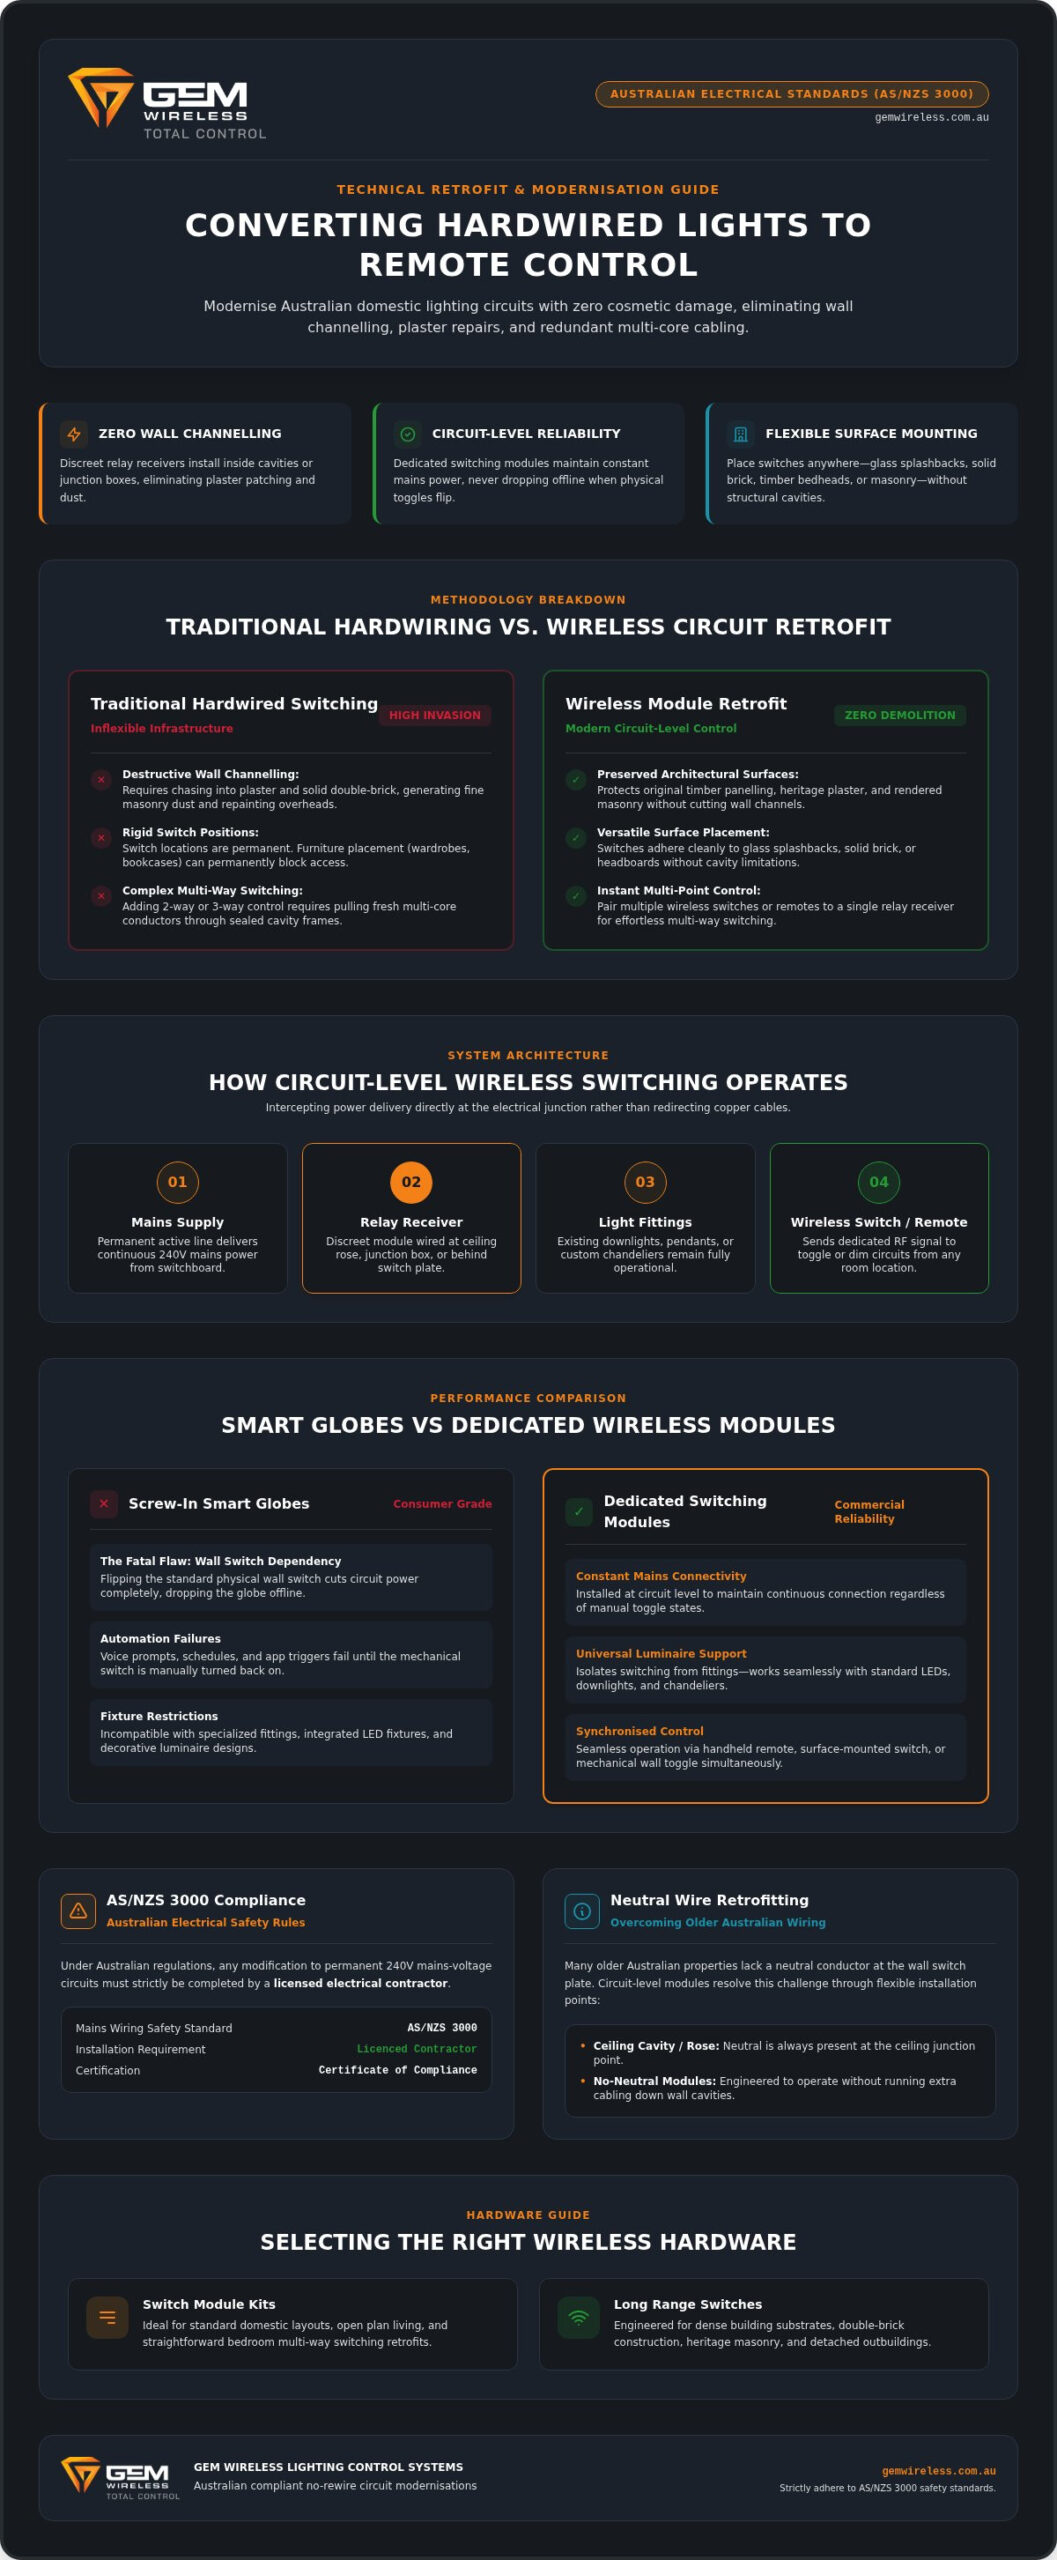
Traditional domestic illumination relies on fixed physical copper cables buried behind your walls. When an Australian home is built, electricians feed these conductors through timber stud frames or brick cavities to link wall plates directly to ceiling luminaires. While this infrastructure provides dependable electrical supply, it creates a rigid environment where modifying your switch points requires significant structural disruption. In contrast, converting hardwired lights to remote control integrates wireless receiver hardware directly into existing circuits, eliminating structural demolition while unlocking flexible operation.
The Limitations of Traditional Hardwired Light Switching
Fixed mechanical switches severely restrict how you arrange your living spaces. Placing a tall bookshelf, wardrobe, or entertainment unit often means covering an essential wall switch. Adding multi-way switching in older homes typically demands pulling supplementary multi-core cables through enclosed wall frames, a labour-intensive task that quickly inflates renovation timelines. Chasing into rendered double-brick walls creates fine dust, ruins finished paintwork, and necessitates messy plastering repairs just to relocate a switch by a metre.
How Remote Control Receiver Modules Function
Modern retrofits solve this dilemma at the circuit level. Rather than redirecting copper runs down your walls, an electrician fits a compact relay module directly into the permanent active wiring at the ceiling rose, junction box, or behind an existing wall plate. This receiver intercepts power delivery and communicates wirelessly with portable remotes or surface-mounted switches using dedicated radio frequency signals.
A wireless setup transforms an inflexible property into an adaptable lighting control system, delivering several distinct advantages:
- Preserved architectural surfaces: Retrofitting maintains original timber panelling, heritage plaster, and masonry without cutting cable channels.
- Multi-point operation: You can pair several remote switches to a single module, creating two-way or three-way switching instantly.
- Flexible switch placement: Surface switches stick directly to glass splashbacks, solid brick walls, or timber bedheads without wall cavities.
- Full circuit integration: You keep your existing light fittings and downlights intact while adding modern control behind the scenes.
For properties where structural modifications are difficult or restricted, opting for no rewire lighting control lets you modernise circuit functionality seamlessly. Converting hardwired lights to remote control gives you modern convenience while protecting your finished interiors.
Evaluating Retrofit Methods: Smart Bulbs vs In-Line Receivers vs Wireless Switch Modules
Selecting the right path for converting hardwired lights to remote control comes down to reliability, everyday usability, and hardware lifespan. While the consumer market offers several paths to wireless lighting, they do not deliver equal performance. Choosing between screw-in smart globes, basic in-line receivers, and dedicated wireless switching modules impacts how your home operates daily.
The Pros and Cons of Smart Bulbs
Smart Wi-Fi globes offer a tempting entry point because they require zero electrical alterations. You simply screw them into existing lamp holders and pair them to an app. The fatal flaw surfaces immediately in a shared household: flip the physical wall switch off, and the bulb loses all power. It drops off your home network completely, rendering automated schedules, voice prompts, and handheld remotes useless until someone physically walks over and flips the wall switch back on.
Why Dedicated Switching Modules Deliver Superior Reliability
Dedicated switching modules solve this issue by operating at the circuit level rather than inside the globe. When an electrician installs a receiver into a ceiling cavity or behind a switch plate, the module maintains constant connection to mains power. The circuit remains permanently operational, whether controlled via a wireless wall plate, a handheld remote, or an existing mechanical switch toggle.
Unlike fragile consumer globes, these commercial-grade modules isolate switching control from the light fitting itself. You can fit standard, energy-efficient LED downlights or custom chandeliers without worrying about connectivity dropping out. Take time to explore this detailed wireless switching modules guide to see how these units integrate across residential and commercial wiring layouts.
Comparing Costs, Longevity, and Ease of Use
Comparing these methods across long-term ownership reveals clear distinctions:
- Hardware longevity: Replacing eight proprietary smart downlights every few years creates unnecessary recurring costs, whereas a hardwired receiver module powers standard, affordable luminaires for years.
- Tactile convenience: Surface-mounted wireless switches provide immediate tactile feedback without forcing family members or guests to launch smartphone apps in the dark.
- Aesthetic integration: Surface switches mirror standard Australian wall plates, sticking directly onto plasterboard, glass, or joinery without cutting cavities.
- Regulatory integrity: Dedicated modules are engineered specifically to meet strict AS/NZS 3000 compliance mandates across Australian dwellings.
When you are planning a lighting upgrade that the whole family can use intuitively, browse the range of robust hardware at Gem Wireless to discover clean retrofit solutions designed for Australian circuits.
How to Convert Hardwired Lights to Remote Control
Modernising your lighting infrastructure follows a systematic, practical process. Rather than cutting plaster or feeding supplementary wiring through inaccessible wall cavities, an electrician integrates a switching receiver into the existing circuit. This modular approach explains why industry specialists consistently favour smart switches over smart bulbs when building reliable, permanent automation. Understanding the retrofit workflow helps you plan the upgrade efficiently.
Step 1 to 3: Electrical Isolation and Module Wiring
Safety dictates every step of the physical conversion. Your licensed electrician begins by isolating the relevant lighting sub-circuit at the main distribution board. A calibrated voltage tester verifies that the supply is completely dead before any enclosure is opened.
Once safety is verified, the conversion proceeds systematically:
- Access the junction: The tradesperson unscrews the ceiling rose, removes the downlight, or opens the primary wall switch plate to expose the existing conductors.
- Identify circuit cores: The technician identifies the permanent active, neutral, and switched active conductors feeding the lighting load.
- Terminate the module: The wireless receiver wires directly between the permanent supply and the load terminals, sitting neatly inside the ceiling space or wall bracket.
By wiring the receiver into the permanent active line, the fixture stays energised and responsive to wireless commands around the clock.
Step 4 to 5: Transmitter Pairing and Switch Placement
With the physical wiring secured, your electrician re-energises the circuit at the switchboard to begin programming. Converting hardwired lights to remote control requires linking your transmitters to the newly installed receiver module. Pressing the learn button on the receiver puts it into pairing mode, after which tapping the wireless wall switch or handheld remote locks in the radio frequency code instantly.
Once paired, you can position your wireless controllers precisely where you need them. Mount surface switches onto rendered masonry, splashbacks, or timber cabinetry using heavy-duty adhesive backing, or fix them to standard flush boxes using mounting screws. You can explore creative room layouts and multi-way setups with our wireless light switch kit guide. The result is instant, multi-point control with zero plaster patching or repainting required.
Key Technical Factors: Wiring Configurations, Neutral Wires, and AS/NZS 3000 Compliance
Electrical safety in Australia is governed by uncompromising standards. Unlike generic international DIY guides that encourage homeowners to experiment with mains power, any work involving 240V building circuits falls under strict statutory oversight. Successfully converting hardwired lights to remote control requires understanding how Australian circuits are wired, what the law mandates, and how modern hardware simplifies adherence to mandatory safety codes.
Navigating Neutral Wire Requirements in Older Homes
The single biggest hurdle when retrofitting lighting switches in Australia is the absence of a neutral conductor behind the wall plate. In traditional residential wiring, electricians used a method known as “looping at the light.” This means the active and neutral supply wires run directly to the ceiling batten or junction box. Only an active feed and a switched active return travel down the wall cavity to the physical switch.
Most advanced electronic receivers demand constant electrical current to operate their radio frequency antennas, which requires a complete circuit including a neutral return. If your electrician tries to fit a module behind a switch plate that lacks a neutral conductor, the unit simply will not function without invasive rewiring. The clean engineering solution is simple:
- Mount at the ceiling: Positioning the switching module directly above the light fixture guarantees immediate access to both active and neutral conductors.
- Utilise cavity space: Compact modules sit comfortably beside ceiling roses, batten holders, or inside downlight cutouts without modifying wall cavities.
- Maintain existing wiring: The original switch cable can either be decommissioned or repurposed as an auxiliary input, preserving finished plaster completely.
Regulatory Compliance and Home Insurance Protection
All fixed electrical installations nationwide must comply strictly with AS/NZS 3000:2018 (commonly known as the Australia/New Zealand Wiring Rules). Under state and territory licensing laws, executing fixed 240V modifications without a current electrical contractor licence is illegal. Performing DIY work on mains wiring risks severe electrical injury, voids property insurance coverage in the event of an electrical fire, and can incur substantial statutory fines.
A licensed electrician ensures that all circuits feature appropriate Residual Current Device (RCD) protection and provides a formal certificate of electrical compliance upon finishing. When planning your upgrade, ensure you choose certified hardware carrying the Regulatory Compliance Mark (RCM). You can order certified switching hardware from Gem Wireless to hand directly to your chosen electrician for a compliant, hassle-free installation.
Selecting the Right Wireless Switching Hardware for Your Property
Every building layout presents unique physical obstacles. Successfully converting hardwired lights to remote control requires selecting switching components that match your property’s electrical loads and construction materials. Choosing underpowered receivers or weak radio frequencies leads to sluggish responses and dropped signals. Specifying the correct hardware upfront guarantees seamless, responsive performance across all your living spaces.
Standard Residential Kits vs Long-Range Solutions
Standard residential layouts typically feature timber stud framing, internal plasterboard partitions, and compact room footprints. Complete Switch Module Kits thrive in these conditions. They contain an engineered receiver module paired with one or more surface-mounted wireless switches, handling day-to-day switching across kitchens, bedrooms, and open living areas with ease.
Substantial properties present tougher transmission challenges. Double-brick internal walls, reinforced concrete slabs, and foil-faced insulation batts can attenuate standard wireless frequencies. Detached workshops, perimeter security floodlights, and garden studios also require stronger signal penetration across open outdoor space. In these scenarios, deploying dedicated long range wireless light switches ensures radio signals punch through dense masonry and span expansive properties without interference.
Commercial Retrofits and Complex Multi-Way Circuits
Commercial venues face distinct operational hurdles. Fitouts in retail stores, hospitality venues, and open-plan offices frequently require reorganising light switching without disrupting structural fixtures. Pulling cables through concrete walls or dropping fresh conduits down exposed columns drives labour costs up substantially. Modular switching systems overcome these hurdles effortlessly:
- Load compatibility: Receivers must handle the precise inrush currents of large LED downlight arrays, fluorescent battens, or high-output commercial fittings.
- Custom switching zones: Multiple wireless wall plates can pair to a single switching module, or one master multi-gang switch can trigger distinct circuit groups across an entire floor.
- Ceiling grid efficiency: Modules wire directly above suspended acoustic ceiling tiles, leaving the ceiling infrastructure undisturbed.
To plan high-density switching across extensive workspaces, consult our detailed commercial wireless lighting solutions guide. Matching your specific building layout with the right Switching Modules turns an awkward physical lighting circuit into an intuitive, flexible lighting network.
Upgrade to Effortless Lighting Control Today
Living with poorly positioned light switches is no longer something you have to tolerate. Successfully converting hardwired lights to remote control gives you the freedom to position wall switches anywhere you need them without tearing into plaster or repainting finished rooms. By installing certified switching hardware directly into your existing circuits, you avoid the common pitfalls of smart bulbs while ensuring rock-solid reliability across every room.
Whether you need to bypass absent neutral wires in an older property or add convenient multi-way control to an open-plan living area, modular wireless receivers deliver a clean, permanent solution. Ready to transform how you control your illumination? Explore Gem Wireless Switch Module Kits to equip your licensed electrician with compliant, durable hardware engineered for Australian buildings. Take the friction out of your lighting upgrade and enjoy seamless, modern control right from day one.
Frequently Asked Questions
Can I convert existing hardwired lights to remote control without running new cables?
Yes, you can convert hardwired lights without pulling new cables through your wall cavities. When converting hardwired lights to remote control, an electrician wires a compact receiver module directly into your existing circuit at the light fixture or ceiling rose. The unit intercepts mains power and communicates with battery-operated or kinetic wireless transmitters, letting you control the lighting without damaging plasterboard or brickwork.
Do I need a licensed electrician to install wireless lighting receiver modules in Australia?
Yes, you legally need a licensed electrical contractor to install receiver modules. In Australia, all fixed 240V mains wiring alterations must comply strictly with AS/NZS 3000 Wiring Rules. While pairing and placing surface-mounted wireless switches is entirely safe for anyone to handle, connecting the receiver module directly to building circuitry involves live mains conductors. Attempting DIY electrical work is illegal and can void your home insurance coverage. If you are planning domestic circuit upgrades or dedicated home charging infrastructure, visit JK Canning Electrical to explore qualified residential electrical services.
Will converting to remote control switches affect my existing light fittings or globes?
No, converting your switches doesn’t require replacing your current fixtures or globes. Dedicated switching modules act as an electronic gatekeeper on the electrical circuit, so they work seamlessly with standard LED downlights, halogen spotlights, pendants, and fluorescent battens. As long as your total lighting load matches the receiver’s rated capacity, your existing illumination setup remains completely intact while gaining modern, wireless functionality.
What happens if my existing wall switch box does not have a neutral wire?
You can install the wireless switching module directly in the ceiling cavity at the light fitting instead. Many older Australian properties only run active and switch lines down to the wall plate, lacking a neutral conductor. Placing the receiver at the luminaire solves this challenge immediately, as both active and neutral conductors are always present at the ceiling batten or junction box.
How far does the remote control signal travel through internal Australian walls?
Standard residential wireless switches reliably transmit signals between 20 and 30 metres through typical timber stud framing and plasterboard. If your property features dense double-brick walls or structural concrete, transmission distances decrease slightly. In those scenarios, or for detached workshops and expansive gardens, specialised Long Range Switches provide amplified signal penetration to ensure rapid, dependable switching regardless of wall substrates.
Can multiple wireless switches control the exact same hardwired light fitting?
Yes, multiple wireless switches can pair to a single receiver module to create effortless multi-way control. This capability makes converting hardwired lights to remote control ideal for long hallways, staircases, or open-plan living zones. You can position a surface switch at every entryway without running complex multi-core cabling through wall framing, giving everyone intuitive, independent access to the same light fixture.
Are wireless remote light switches battery-operated or powered by mains electricity?
Both options are readily available depending on your project requirements. Surface-mounted wireless wall switches typically rely on long-life coin-cell batteries or kinetic micro-generators that harvest mechanical energy from your press, requiring zero wiring. Alternatively, Mains Powered Switches can fit into existing switch plates where continuous 240V supply is already present, giving you flexible choices across every room.
AS/NZS 3000electrical safetyhome renovationlighting retrofitlighting upgraderemote control lightssmart lightingwireless light switch